Original Link: https://www.anandtech.com/show/4960/benq-ew2420-monitor-review
BenQ EW2420 Monitor Review
by Chris Heinonen on October 13, 2011 12:00 AM ESTBenQ EW2420 Introduction
The EW2420 from BenQ is designed for use as a multi-purpose display. While it has the standard DVI and HDMI port you would expect on a current monitor, it also has an additional HDMI port for another video source like a video game system or Blu-ray player, as well as speakers for the audio from these sources. Of course, if the panel doesn’t perform well then it doesn’t matter how many inputs it has, but the BenQ looks promising with both a VA panel and an LED backlight.


Hardware Impressions
Out of the box, the mounting system for the BenQ was easy to install, but not very robust. It does have the ability to tilt the monitor, but lacks any swivel or height adjustment. There is a small clip for routing your cables through, but to fit a cable through you have to remove it and then reattach it. An HDMI cable or a headphone cable should fit through but it would have been far more useful had they allowed a way to slip a cable in there instead of needing to remove the whole clip to add one. There is an optional headphone holder for the top of the monitor included as well. If you wish to wall mount, or use a different mount than the included one, there is a standard 100mm x 100mm VESA mounting pattern on the back of the display.
The bezel around the display itself is a shiny black plastic, a look that I’m not a big fan of. To me the shiny edge of the screen just attracts fingerprints and can produce a distracting glare in bright lighting conditions, which a matte finish manages to avoid. The controls for the display are set to the right side of the screen and labeled with light gray text on the bezel.
| BenQ EW2420 | |
| Video Inputs | DVI-D, D-sub, 2x HDMI 1.3 |
| Panel Type | VA |
| Pixel Pitch | 0.276 mm |
| Colors | 16.7 Million |
| Brightness | 250 nits (typical) |
| Contrast Ratio | 3000:1 (typical) |
| Response Time | 8 ms (GTG) |
| Viewable Size | 24" |
| Resolution | 1920x1080 at 60 Hz |
| Viewing Angle | 178 degrees horizontal and vertical |
| Backlight | LED |
| Power Consumption (operation) | 53 watts (maximum) |
| Power Consumption (standby) | Less than 1W |
| Screen Treatment | Antiglare with hard-coating 3H |
| Height-Adjustable | No |
| Tilt | -5 degrees to +20 degrees |
| Pivot | No |
| Swivel | No |
| VESA Wall Mounting | Yes: 100 mm x 100 mm |
| Dimensions w/ Base (WxHxD) | 17.32" x 21.91" x 7.05" |
| Weight | 11.24 lbs with stand |
| Additional Features |
USB 2.0 Hi-Speed Hub (1 upstream and 4 downstream ports) 2 x 1.5 watt speakers Headphone and line-in jacks |
| Warranty | 1-Year Limited |
| Accessories |
D-Sub cable 3.5mm audio cable USB cable Power cable Manual and driver CD |
| Price |
Starting at $263 Online $229 from BenQ after Coupon Code: ew2420oct$ |
OSD Menus
The OSD controls for the EW2420 are broken down into five main screens: Display, Picture, Picture Advanced, Audio, and System. For most users the Display screen will go unused as it only applies to the non-digital D-sub input. It would probably be better if BenQ moved this screen to a lower selection in the menu instead of being the initial choice, as it will be used so much less compared to the other choices. Picture contains your standard Brightness and Contrast settings, as well as a Sharpness control, a Gamma control that is welcome to see, Color for an advanced Color sub-menu, and AMA. AMA enables panel overdrive to take the Gray-to-Gray times from 25ms down to 8ms. If you are using the panel for gaming, this sounds like an option you will want to enable, but we’ll see later how much it actually helps.


If you venture into the Color sub-menu, you will find a single set of RGB gain controls for the white balance, as well as a hue and saturation control. These are only enabled if you select the User Mode choice from the different color modes available. The Normal and User modes were closer to 6500K in temperature than either the Reddish or Bluish choices, which were so far off the mark I can’t imagine someone using them as their choice.
Picture Advanced lets you pick between different picture modes that claim to be designed for different content types, but the majority of these are very skewed and not likely to be used. The Standard and sRGB modes provided the best results of the available choices, and I went with Standard as it allowed for the most customization. The Senseye Demo mode allows you to compare the Standard mode in a split screen to the other picture modes, in case you want to see how drastically they affect the image. Dynamic Contrast affects how aggressively the LED lighting operates (it’s automatically disabled on sRGB, Standard, and Eco modes) and Display Mode lets you choose if you want to have images scaled to use the entire screen, or if you want to maintain the correct aspect ratio on a signal that isn’t 1080p.
Color format lets you choose between YUV or RGB encoding for your digital video signal, which we will test in a later section for color handling capabilities, and finally the HDMI RGB PC Range lets you select between RGB PC video levels (0-255) and RGB Video Levels (16-235). As the EW2420 is designed to serve as a multi-purpose display, this will be very important if one of the HDMI inputs is used with a digital TV tuner, PS3, Xbox 360, or other device that uses the video range. Having the incorrect range would lead to crushed highlights and a lack of shadow detail on all of your video material, since the monitor would be optimized for the wrong range.
Audio lets you set the volume of the speakers, mute the audio, and select the source for the audio. Using a Mini-DisplayPort to HDMI adapter on my MacBook Air, I was able to send audio perfectly fine to the BenQ, though even at bare minimum the volume was louder than I would have preferred it to be. The sound wasn’t anything fantastic, but it was better than the speakers in my laptop and will work just fine for occasional use. If you want higher quality sound, I’d recommend using the headphone jack on the left side of the display, or a separate set of speakers. Finally, the System menu provides your standard functions such as input selection, OSD positioning and time out, DDC/CI control, and information on the signal being received.
The OSD is reasonably easy to navigate through, though I often found myself hitting a button to go in the wrong direction than I intended. A label on the screen that showed which direction each button would move the cursor would be nice. Additionally the Auto button at the top is going to be used very little by people now that analog connections are so uncommon for people to use on their display. Much like defaulting to the Display screen initially in the menus, this seems to be a design touch that is out-of-date now.
Viewing Angles
With it’s VA panel, the BenQ looks better at off angle viewing than a TN display would, though not quite as good as an IPS panel can. Moving off-angle you begin to get an image that washes out a bit, but not the color shifts that are common to TN panels. Moving as little as 15-20% off to the side can lead to the loss of color so I would recommend keeping the monitor as close to lined up directly with your eyes as possible. The stand only has tilt adjust, so if you need height or swivel support to keep it in line, you might want to consider a different stand or mount that can use the 100mm VESA mounting holes.


Color Quality
With a VA panel and LED lighting, the BenQ EW2420 seemingly has everything in place to produce a very good image. Using the included profile, we find a Delta E (dE) of over 10 with the highest levels of error coming in the grayscale, where we least want them to occur.
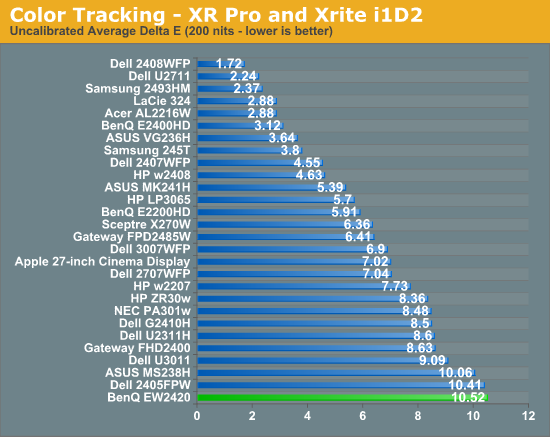
Using ColorEyes Display Pro, we set our calibration target for a D65 white point, 2.2 gamma, and 200 nits of light output. We are using an i1Display2 meter for our measurements and making sure to give the display an hour to stabilize in readings. The BenQ EW2420 supports DDC controls so I attempted to calibrate using DDC and to calibrate manually using the RGB gain controls available to the user in Standard mode. The difference between the two methods resulted in a dE difference of 0.04, well within any margin of error, so I used the DDC mode since the results were as good, and the easier method is more likely to be used.
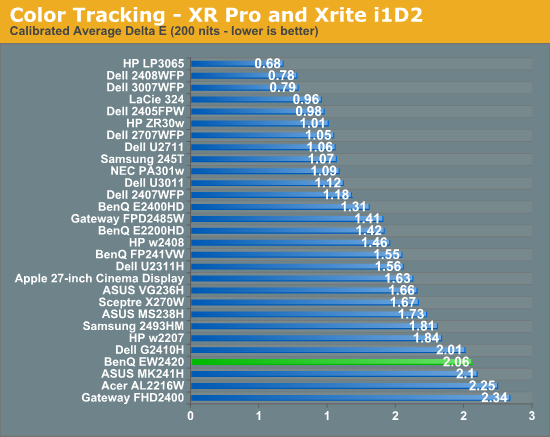
After calibration we see that the dE was moved from over 10 down to just over 2. A closer look at the individual calibration numbers show that the grayscale tracks very well at the points measured, and the colors in the GMB color checker that are producing most of the error are heavily weighted towards blue. Additionally one of the samples in the GMB color checker, a shade of cyan, falls outside of the sRGB gamut so monitors that can’t do the AdobeRGB color space are always going to produce a large error on that sample.
Blue color errors are both preferable to other color errors as our eyes are less sensitive to them than to errors in red or green. This is another reason to pay close attention to the detailed breakdown of the dE number and not just focus on the overall number.
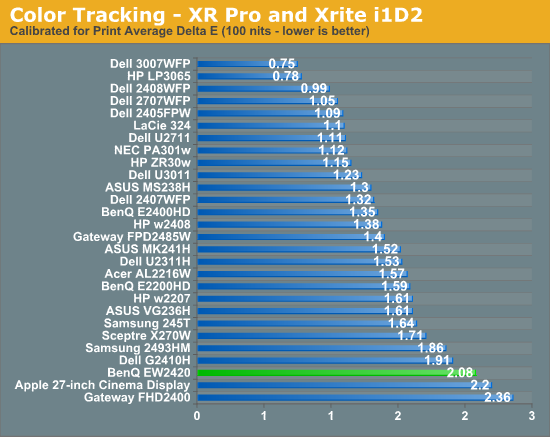
With 100 nits, we see very similar performance, though the dE in the grayscale goes up at the lower end of it. As mentioned before, this could be due in part to darker output levels than the 200 nits result leading to measurement errors.
Color Uniformity
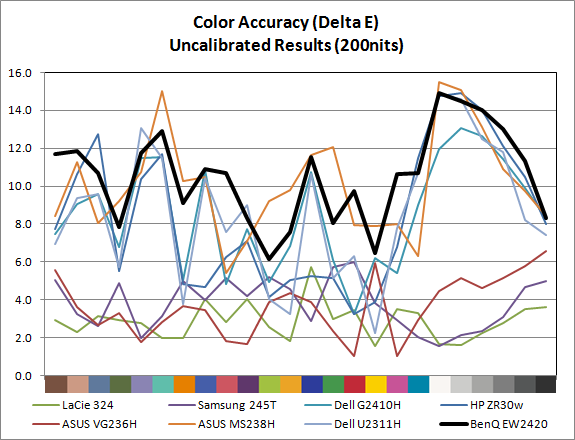
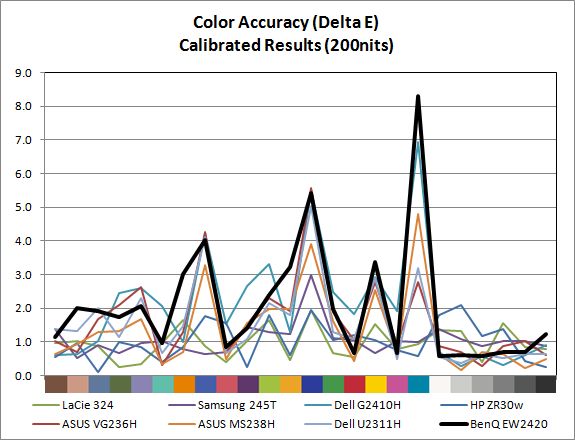
The overall color quality of the BenQ was just acceptable with a dE of slightly over 2, and that isn’t limited to the center. Color quality is best at the center and middle-bottom of the screen, with the error level getting higher at the top and corners of the screen.
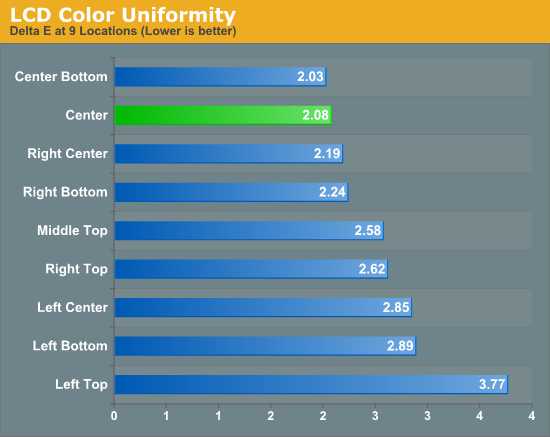
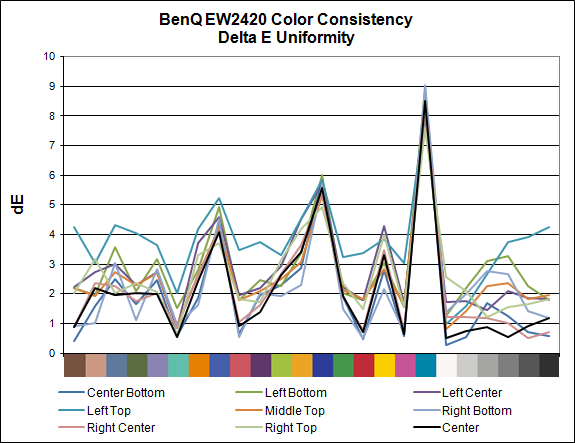

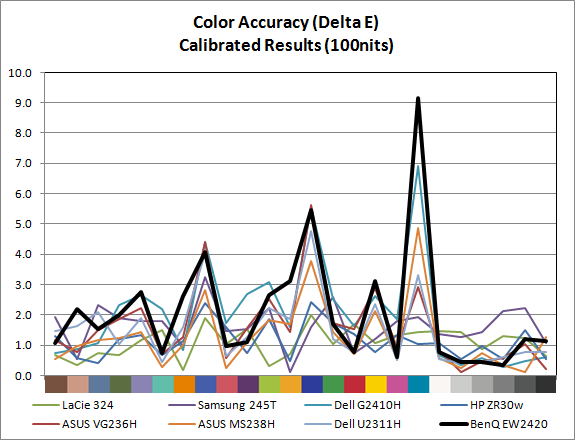
This is a pattern that we will see repeated when we get to the brightness uniformity charts as well. Most likely this is caused by unevenness in the LED backlighting across the screen, which influences the color quality as a result. With a dE that doesn’t fall below 2 anywhere on the screen, the BenQ isn’t a display that can be recommended for serious print work, but for day-to-day use it should be good enough. As with most displays the highest dE errors occur in colors that are a majority blue, and these errors are less visible to the eye than if the colors were mostly red or green. Grayscale tracking was very good overall, and that’s the most important element of image as far as human vision is concerned.
Color Gamut
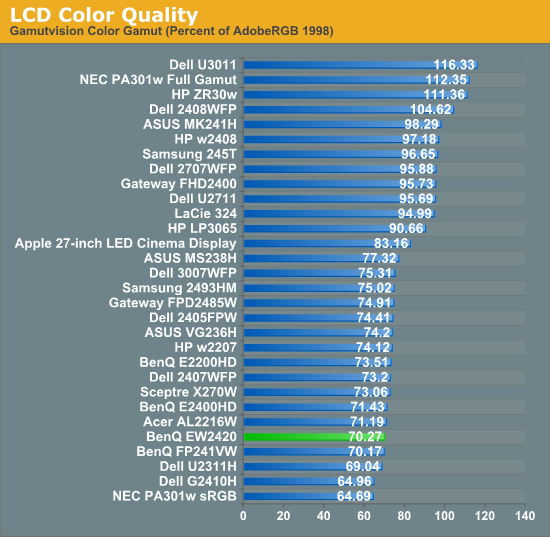
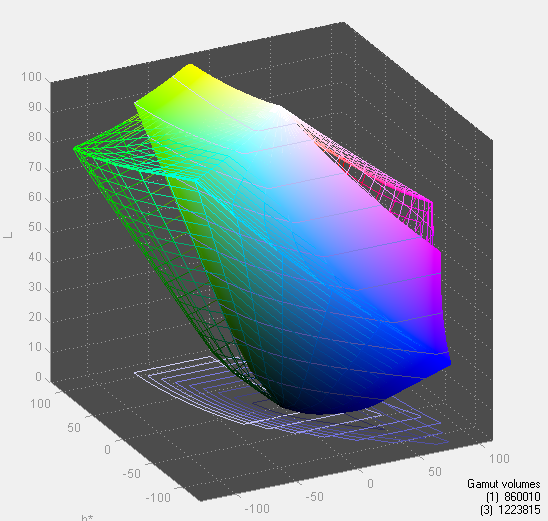
The BenQ EW2420 has LED backlighting but still only covers the standard sRGB colorspace and not the AdobeRGB space. We see in the gamut chart that it covers around 70% of the AdobeRGB space, which is average. This also contributes to the higher dE values as some of the color samples used in that test fall outside of the sRGB gamut.
Brightness and Contrast
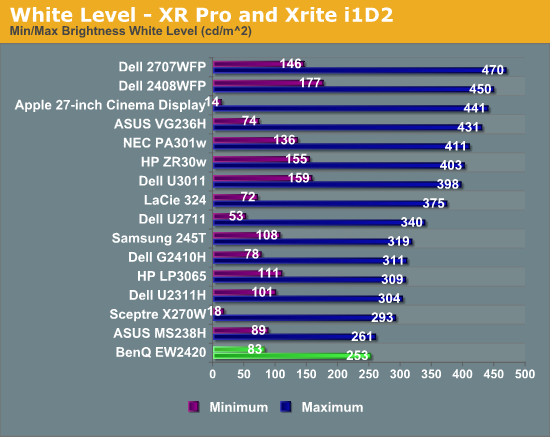
While the move to an LED instead of a CCFL backlight might mean many things, in the case of the EW2420 it does not mean higher maximum light output. With the backlight and contrast controls at maximum it manages 253 nits of light output. Moving the brightness control down to minimum but leaving the contrast control maximized, the light output falls to 83 nits.
Where the LED backlighting shines is on the light output when displaying a black screen. With the brightness at maximum, the light output with a black screen is only 0.066 nits, and it falls all the way down to 0.022 nits with the brightness at minimum.
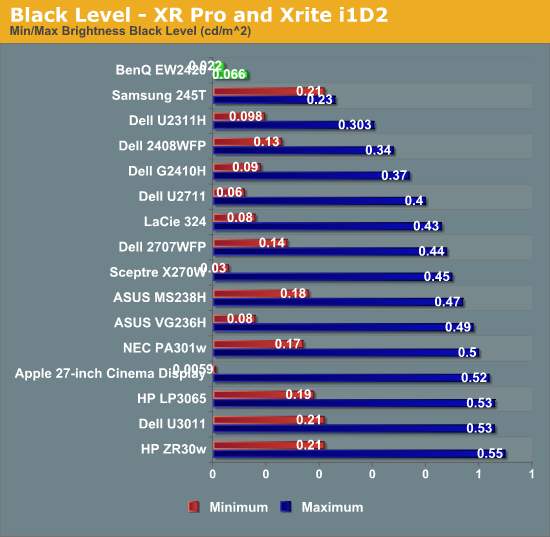
What this great black level leads to are superb contrast ratios over 3,800:1 at minimum or maximum brightness, even better than what BenQ specified. This is far more important than the maximum light output since most users will probably use the display somewhere between 100 and 200 nits, and the greater contrast range will be something that you can see. For viewing photos, watching a movie, or playing a game, a higher contrast ratio will make a big difference in the image you can see.
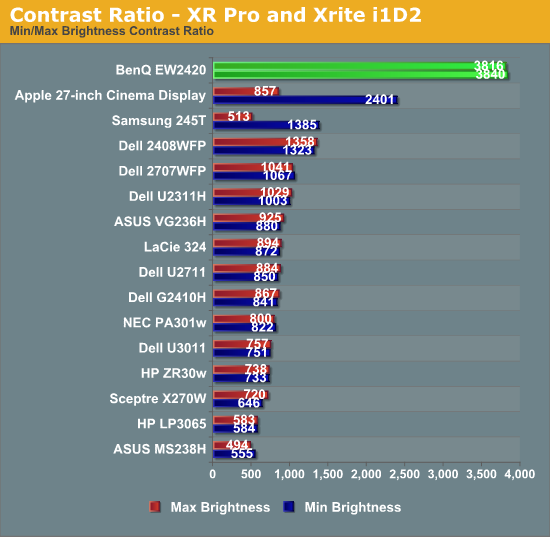
Compared to other displays, the BenQ is far ahead of everyone else. There are other LED lit displays on here, so I’m not sure if it is the combination of the VA panel and the LED lighting, or if they use LED lights with more addressable zones for better light control, or another method. It’s worth nothing that the most advanced LED-backlit televisions can put out a black level below what our test instruments can measure, so monitors still have a little bit further to go with the LED technology, but those sets also are very expensive in comparison.
Brightness Uniformity
With our center measurement at 200 nits, I then measured the light output of a pure white window at nine locations on the screen for the BenQ. While the center and bottom middle locations both are right at that 200 nits level, the light output drops down to the 170-180 nits level at the top of the display.

This is better uniformity than the last display I tested, but it still isn’t quite ideal. Since we disable dynamic contrast, the non-uniform lighting is just a case of the LEDs not being positioned/diffused optimally. The best way to address this is to use rear LED lighting instead of edge LED lighting, but that leads to a far more expensive, and thicker, display than an edge-lit one.
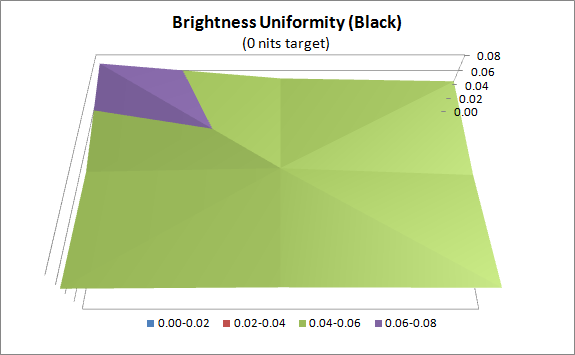
Black uniformity is better than white uniformity. The standard deviation is only 0.007 nits, which is very low. The BenQ is the darkest display I have used on my PC, and it is that way all across the screen.
AV Use and Calibration
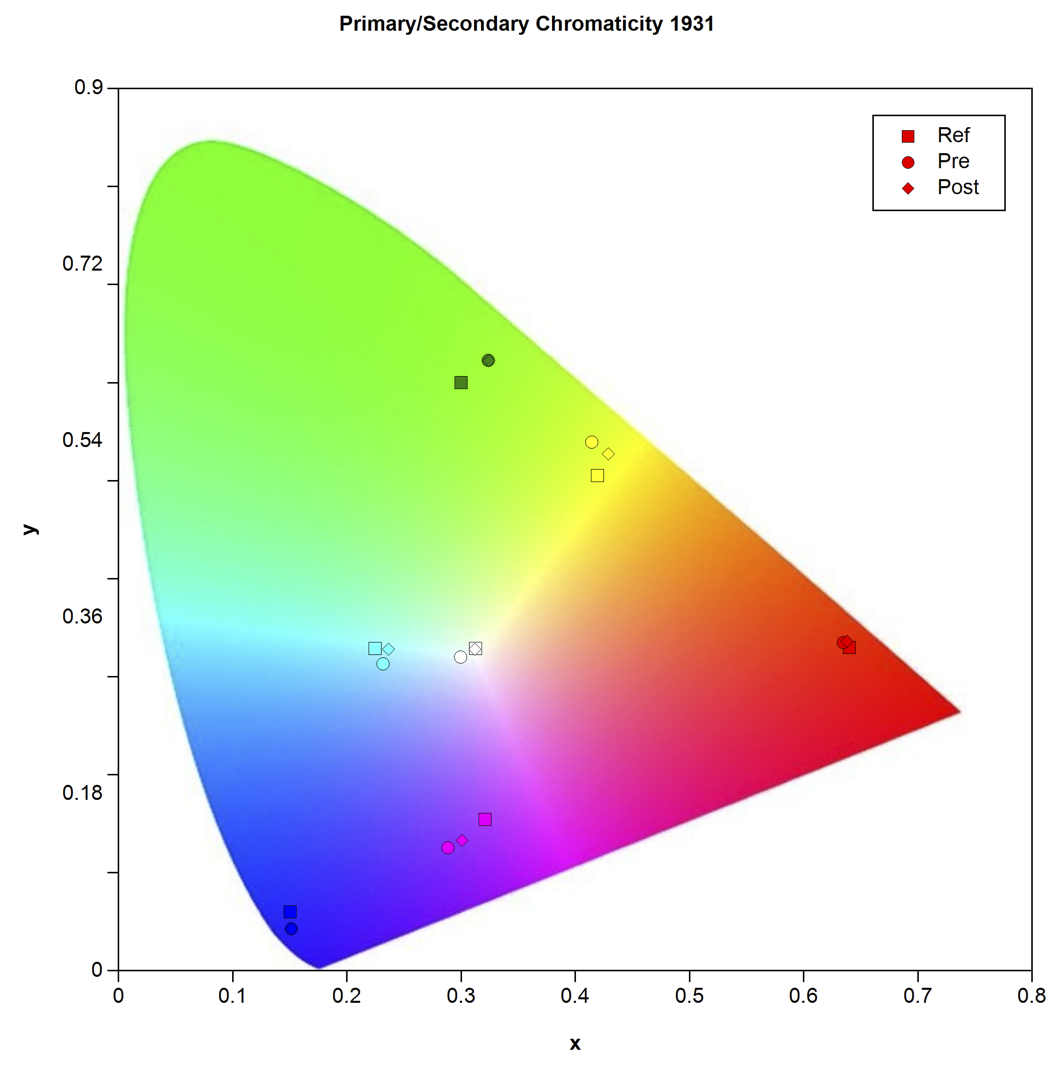
With its multiple HDMI inputs, speakers, and headphone jack, the EW2420 is specifically designed to be used not only as a computer display, but also for your video game system, Blu-ray player, or cable box. To test this, I went ahead and calibrated the HDMI1 input using an Oppo BDP-93 Blu-ray player as the source at 1080p resolution. The test pattern source was the AVS HD 709 disc that anyone can download from the AVS Forums website for free, and measurements were done using ChromaPure calibration software and an X-Rite i1DisplayPro which has custom offsets for different display types, including LED lit LCDs.
The first issue that came up was trying to set the brightness correctly using a PLUGE pattern. When I set the Oppo to output RGB Video Level content over HDMI, no matter how low I set the brightness, I couldn’t get video levels below 16 to stop flashing. Ideally, video level 16 should be barely visible when it flashes, and nothing below that should be there as 16 is the darkest level that should be encoded on consumer HD content. If I switched to YCbCr 4:2:2 or 4:4:4 video output, then no matter how high I turned the brightness, video levels below 18 wouldn’t flash. This left me with the choice of either severely washed out shadow detail with an RGB signal, or missing the very darkest shadow detail with YCbCr output. I chose YCbCr, as RGB looked far worse on material.
With the Contrast, there is a similar pattern on AVS where you attempt to set contrast high enough to hide all the flashing blocks above video level 235, which is peak white. Sometimes you might stop before then as it would be too bright, in which case you can use a 100% white pattern and set the light output to a level you want (such as 120 nits or 35 foot-Lamberts). With the BenQ, once the contrast got above 40, the white background and gray blocks started to take on a red tint, which often happens with a digital display if you set the contrast too high. I dialed the contrast back to before this happened, which still left a lot of blocks above 235 flashing, but I still had 190 nits of light output to work with. You could easily dial this back quite a bit and still have a good image for a dark room, but this would work well with plenty of lighting from a distance.
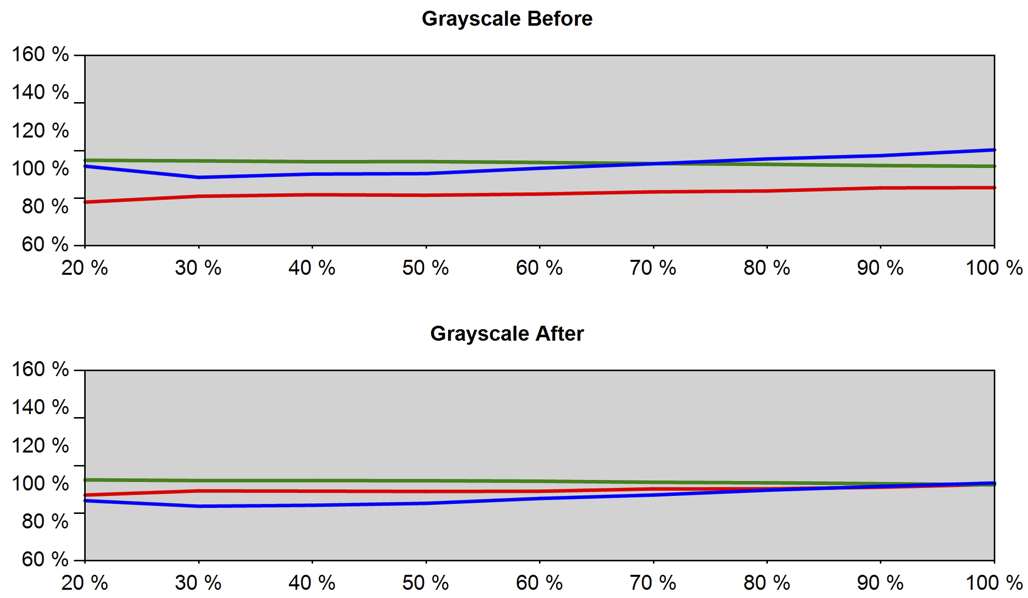
Despite the labels on the Gamma settings, I found that 2.2 was producing a gamma curve around 2.45 and 2.0 was producing just under my target of 2.2. Since 2.45 would be very dark, and we’re already losing some shadow detail due to the colorspace issue I talked about earlier, I chose the 2.0 value for the calibration. I tested all of the video modes on the BenQ for the grayscale and the Standard mode was the closest to 6500K in temperature at 100% white, so that is what I chose to use. As you can see from the Grayscale Before chart, it was lacking in red all across the spectrum.
The BenQ also only offers one set of RGB gain controls for the white balance. I chose to set the 100% white point with them, though I’m not sure that’s the correct choice. Values around 70% or 80% are more common with televisions, so I might choose that as my target white point calibration level, since it would potentially even out the curve both at the top and the bottom and possibly lead to a lower dE overall. Adjusting these controls is also going to affect your Gamma curve, so you need to go back and forth to make sure these are working together OK.
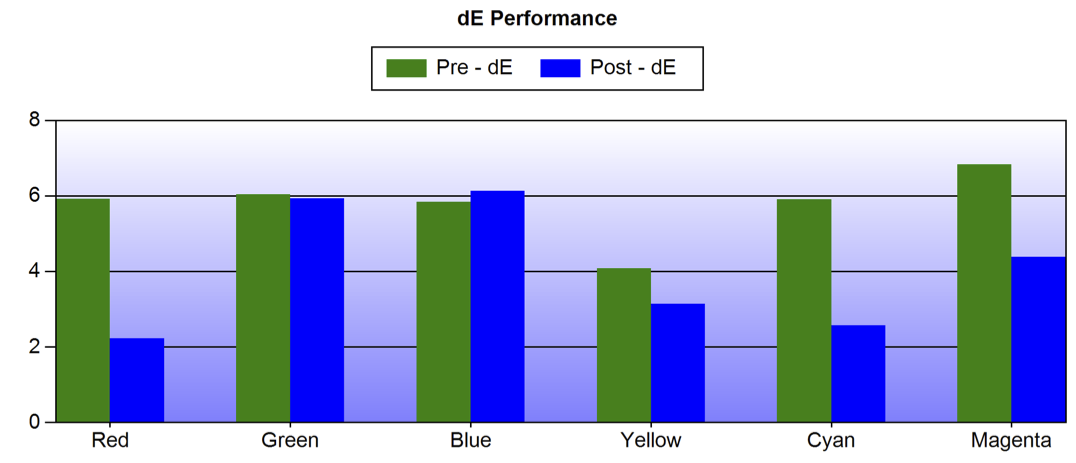
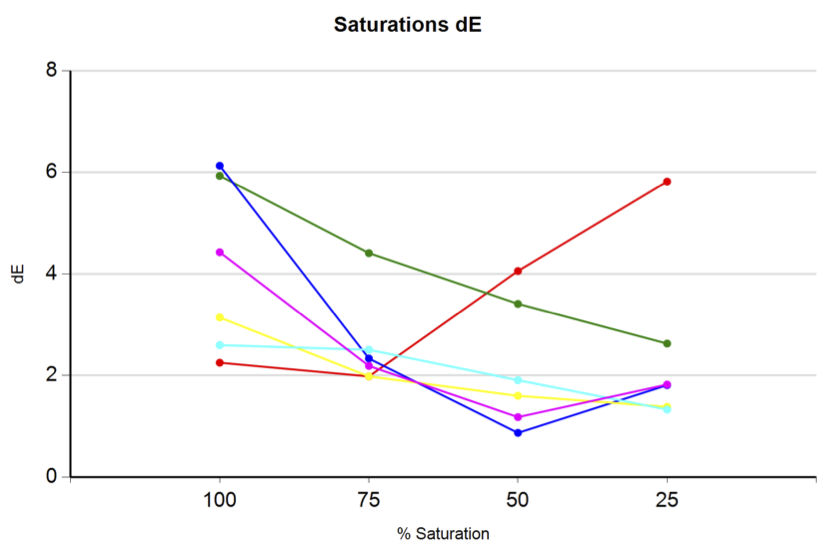
Beyond these controls, the only things I could set with the BenQ are a Color control (labeled as Saturation) and Tint (labeled as Hue). The saturations were actually quite accurate for a display and it only took one click up to 51 to get the levels correct. Hue was just one click high and setting that down to 49 led to a very nice measurement for Cyan (which is used to set Tint). One feature in ChromaPure that I like is the ability to measure different saturation levels for colors and not just the standard 100% values that you will see. It is pretty rare to see a 100% value in real world content, and having those intermediate saturations correct is very important. Here we can see that with the exception of red, all colors start out with lower dE levels and then rise up to their highest dE level at 100%. Given the relatively small number of adjustments that could be made to color, this was a very nice result in the end.
I quickly tested the video processing capabilities of the EW2420 as well. It won’t accept a 1080p24 signal, so you cannot output that from your Blu-ray player if that’s what you intend to do. It also failed deinterlacing for video (2:2) and film (3:2) content pretty miserably. Because of this, make sure to set your source content to 1080p and not 1080i for use with the display, as otherwise jaggies and other artifacts will be visible in the content. It did pass all chroma and luma detail at 4:2:2, 4:4:4, and RGB colorspaces correctly, so that was good. The fact that it skews the levels of content based on colorspace is a bit of an unattractive feature, however.
The best compromise for using the monitor in both a video display and PC setup would be to calibrate the monitor using a Blu-ray disc as I did, and then calibrate it on the PC, but not in DDC mode. Almost all of the necessary corrections could then be done in the video card LUTs without affecting your image that was calibrated correctly for video content. Since we were able to get almost 200 nits out of our calibrated settings as well, it should work fine in this setup as long as you do the video settings first for the best results.
Lag Measurements and Gaming Use
As with my previous review, the BenQ was evaluated for gaming use by testing the lag using a comparison to a Viewsonic G90f CRT monitor setup with a mirrored desktop in Windows 7. Both were run at XGA resolution and at 75 Hz through the opening demo loop in the 3DMark03 benchmark test. I used my SLR to take images at 1/320 of a second and then analyzed the data to find the average amount of lag between the two monitors. The BenQ has a feature called AMA, or Advanced Motion Accelerator. I ran the tests with this enabled and disabled.
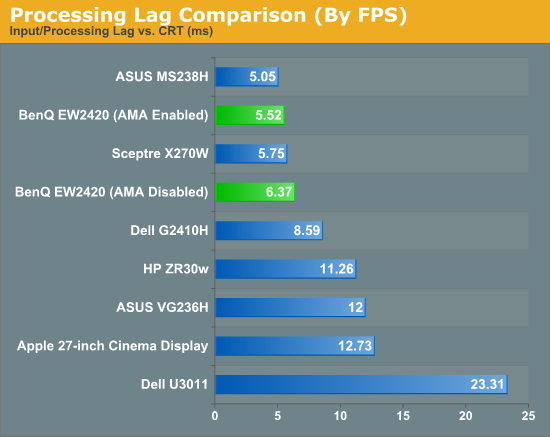
I didn’t notice any difference in the response time with AMA enabled or disabled in use, and the test results seem to show that’s the case. Similarly, with or without AMA, I didn’t notice any issues when playing any games. Motion is smooth without ghosting, and no lag is present that I could blame for my horrible FPS skills at this point in my life.
Response times are around 6ms and very good overall, right up there with what faster TN panels can manage. This is the one area where we’ve seen BenQ use MVA panels in the past (instead of PVA), with the result being faster response times. Overall, the BenQ performs very well in the lag and gaming tests.
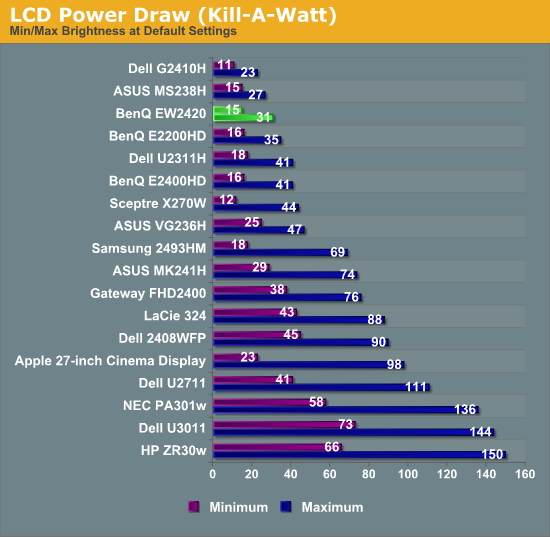
Power Consumption
Another benefit of the LEDs compared to a CCFL display is the reduced cost of running them and lower heat output. The EW2420 took only 31 watts to operate at peak brightness, and just 15 watts at minimum brightness. This is around 25% less than comparable CCFL monitors of the same size. While that might seem like a low amount of power, when you run a display for 8-10 hours a day, every day, that can start to add up. You would see far more savings potential in a 27” or 30” display, but cutting your monitor power use by 25% is always a good thing. Turning off your 60W light bulbs or switching to mini-fluorescent lights for rooms where you use lights most of the day would of course have a bigger impact on your power bill than cutting a single LCD power use by 25%, but that’s a discussion for a different forum.
Final Thoughts
The BenQ EW2420 came in with a lot of promise packing both a VA panel and an LED backlight. Unfortunately, in terms of overall color quality it couldn’t quite deliver what a lot of other monitors in the same range can. While the overall average dE might be just below the visible level to the human eye, it was not good enough for serious color or print work. The contrast level was really very good, and the black level was very low, but those still can’t make up for the imprecise color.
The OSD menu system also managed to continually frustrate me, with the buttons often working in the reverse direction than I would expect them to, making the task of doing adjustments a longer process than expected. However, the BenQ does have dual HDMI inputs and a DVI input, along with internal speakers, allowing it to serve double duty as a monitor and a video game or TV display.
Used this way, the BenQ performed better than I expected it to. The issue with setting brightness and the different colorspaces was a bit of a problem, but despite only having one point of adjustment and no CMS, it wound up with a very respectable grayscale and color performance. Many dedicated TVs have far larger errors in color than the BenQ exhibited and also no way to correct them. I still don’t think I would use it for multiple people to watch TV or games on due to the contrast shift in the VA panel as you move off-angle, but in a dorm room or bedroom it should suffice.
There aren’t many other displays out there with multiple HDMI inputs, speakers, LED backlighting, and a non-TN panel, so if those are your requirements then the BenQ is one of the few options that will work for you. You can always add an HDMI switch to any monitor for $25 with a remote, but I wish that BenQ had included a remote with the display, as being able to easily adjust the volume and change inputs would make it far more useful for the role they position it in. I think if you are putting speakers into your HDMI enabled monitor, you need to include separate keys for controlling volume instead of making users navigate a menu to adjust something so common.
As just a desktop display, the BenQ doesn’t have the color accuracy to really recommend it over other options, and as a dual purpose display the usability leaves a bit to be desired. Perhaps with some refinements in the next version the EW2420 will do a better job filling the role it was designed for and will be one that we can easily recommend. However, if you’re looking for something better than your typical TN panel with dual HDMI inputs, decent viewing angles, and you don't need optimal color accuracy (yes, that's several specific needs), the online price of $263 makes it a reasonable fit.


